Showing posts with label DIY. Show all posts

Friday, July 5, 2013

Fun Filled Fourth

I have to admit a small part of me was never excited about holidays, but ever since my son was born the mommy I was always suppose to be came out. I love doing crafts with him and doing cute stuff for every holiday that comes up. This year for Fourth of July I made sure I included him in everything I did this year. If you did not see the Stained Jello Stars check out my blog post on that.

My son is in daycare and since they were out for Fourth of July they asked me if he could wear his patriotic shirt on Wednesday. I thought it would be a great idea to make one plus it would make him happy to tell his classmates that he made it.

Now for lunch I thought really hard on what I could do to make it very Fourth of July. I made pizza grilled sandwiches and used my star cookie cutters. For our drinks I decided to make layered drinks, which by the way were very delicious. That afternoon my parents and I decided to eat outside again by just making hot dogs with more layered drinks and some deliciously fresh fruit. I cut all the watermelon in stars, added blueberries and cherries. Later that night we headed to see the fireworks in Flowermound. I know is not as fancy and awesome but many people know about it I'm assuming like Kaboom Town so I like that is not as crowded. I hope you all had a lovely Fourth of July with your family. Whether it was just relaxing at home, barbecuing or going to festivals.


Wednesday, May 29, 2013

DIY Product Holder

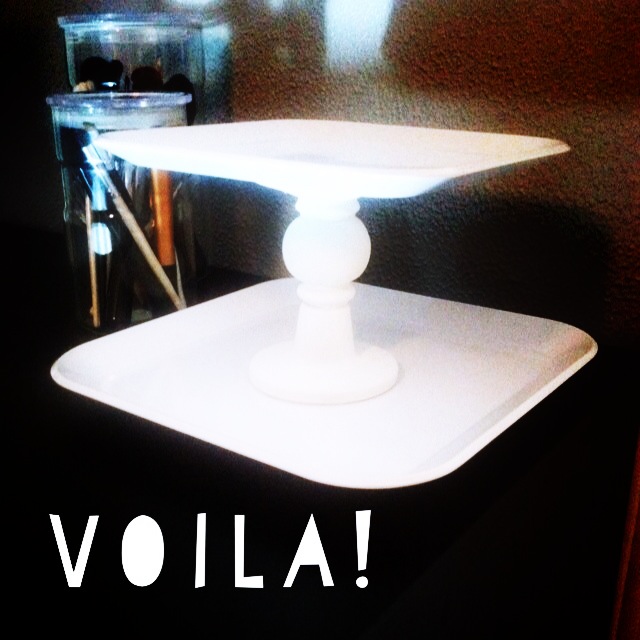
I am very OCD when it comes to my things being all over the place. I was on Pinterest like always and came across a couple of jewelry tier holders, but I decided to make one to store my skin care products and a couple of my everyday jewelry in a tiny bowl. I will be posting some photos down below and steps on how to do this. It is very simple and can find all these items anywhere even a goodwill.

YOU NEED:
♥ Hot glue gun
♥ Glue sticks for the hot glue gun
♥ Lazy susan (optional)
♥ 2 to 3 plates of your choice
♥ Candle holder to use as a spacers
♥ Spray paint

STEPS:
♥ Spray paint plates or spacers if you would like them a different color. I only painted the spacers, the plates      I was able to find at Target for a little over a $1.
♥ Glue the lazy susan at the bottom of the largest plate, and I also suggest to glue a small piece of wood at the bottom to make it rotate more easily.
♥ Glue the spacers and keep adding as many plates as you would like, I suggest using the two largest and a small at the top, but I didn't want mine too long.
♥ That's all guys! Enjoy your holder for whatever you would like.


Thursday, May 9, 2013

Mother's Day DIY's

Mother's day is just around the corner and if you have no idea what to get your beloved mother and want something more special than just store bought, I will post some ideas down below. Lately I have been all about being crafty and Pinterest never seems to fail me. Whether you are a mother yourself or giving something to your mother or grandmother this is a time to celebrate motherhood.


Monday, November 5, 2012

Cattitude

I am a big dog lover but cats are ruling the fashion world right now. I've seen them in the catwalk (get it CATwalk...hehe)  anyways and big top celebrities rocking this new trend. It's a cat's tale! I am loving particularly the cat loafers, but they are way out of my budget. There is some companies that are making the look a likes that are pretty darn close but I think it will be easier to just make them. You can either use an oil based sharpie or even sew them yourself.


That's not all the cat's have taken over! The cat sweater is back?! You're probably asking yourself "What?!" Well cat sweaters were very popular in the 80's believe it or not. I guess is true when they say trends always come back. Let me know what you think of this trend or send me a pic of your DIY I would love to see.


Thursday, October 4, 2012

DIY Wired Rings

One of the biggest trends we are seeing are wearing really dainty delicate rings. I immediately fell in love with them because they were so girly and not to over the top. There is many websites that sell them and very affordable but once shipping is included I don't think is worth the price. So I mentioned this to my boyfriend and he decided to help me out. We went to Michael's and got a 16 gauge dead soft wired in gold and some craft pliers. It is a bit complicated to do but once you get the hang of it, it is very easy. Even though I didn't do most of the job. Pictures down below will show the final product :)


Thursday, September 20, 2012

How To Clean Your Makeup Brushes

I know from time to time we tend to forget about our makeup brushes. We make sure our face is squeaky clean and all but forget about our makeup tools. The thing is that cleaning and disinfecting our makeup brushes is just as important since that could be the reason why our face might be breaking out. I have a video posted showing you how I clean them. Feel free to watch it. Enjoy :)


Saturday, August 18, 2012

DIY: Cap Toe Pumps

So for a while I've been admiring the Chanel classic cap toe pumpss. As much as I love them the truth is that I can't afford them even on eBay money...haha I decided after much inspiration on the internet I figured how hard can it be to do it myself. I bought some very inexpensive heels from Forever 21 around $22. So let's start this DIY.

1. Take your items needed. In this case all you really need is a pair of heels, tape, and black nail polish

2. Apply tape over the front of the heel and cover as much as you would like to achieve the cap toe trend

3. Paint the front heel with one coat and wait a couple of minutes before moving on to the second coat. You can add a clear top coat if you would like but mine seemed to achieve that high gloss effect by itself

4. Wait about 15 minutes or so before removing the tape and VOILA your very own Chanel inspired cap toe pumps

Chanel Beige Leather Cap Toe Pumps $460
Forever 21 Nude Chunky Heels $22


Friday, October 28, 2011

Fringe Trend

We all know that a scarf is a must have accessory all year long. Fringe has been very IN this year from fringe skirts, fringe handbags but also fringe scarves as seen on celebrities. I found a few at SHOPSTYLE that I loved but they were a fortune. I will be showing you to make your own and save money for your wallet.


This 'Felix Snood' scarf at DVF.com- $175

Products you need:
♥ Solid t-shirt
♥ Fabric scissors


1. Lay solid t-shirt on a flat surface. The floor seemed to work for me.
2. Cut t-shirt in half as shown above
3. On one of the ends cut strips vertically and taking it as far as you want depending how much fringe you want
4. Repeat the same step on the other side
5. Stretch out all the strips one by one to hide the cut marks
6. Stretch out the entire t-shirt all around
7. The final look will look like a circle scarf with fringe all around